Import Excel File into MySQL Database using PHP
Database backup and restore is the most important thing in maintaining software. Periodical automatic backup is a must for any project.If in case, there is an unknown security flaw and that affects your system, then your backup is the holy grail to save you. Exporting database into a backup file may be used in future to restore your system. So it is always necessary to verify your backup file by doing a test restore.

Generally, the backup file will be in SQL, Excel or CSV format. The database clients available in the market provides an option to import the backup file in these formats to restore data. We are going to create our own PHP database client to import data from an Excel file.

I have a HTML form with a file upload option which only accepts Excel files. After uploading the file, I parsed Excel data to insert them into a database. I used SpreadSheet Reader library for reading the Excel file using PHP. Restoring excel backup into a database via programming will save our time. Let us study how to implement a quick restore by importing bulk data from excel files. If you are looking for export try my earlier article on export data in CSV format.
In this tutorial im going to show you how to create n application that can be used to import CSV/Excel file using PHP. To start with this project create a Database in your phpmyadmin named “studentdb” then execute this SQL query to create a new table called subject.
-
-
CREATE TABLE IF NOT EXISTS `subject` (
-
`SUBJ_ID` INT(11) NOT NULL AUTO_INCREMENT,
-
`SUBJ_CODE` VARCHAR(30) NOT NULL,
-
`SUBJ_DESCRIPTION` VARCHAR(255) NOT NULL,
-
`UNIT` INT(2) NOT NULL,
-
`PRE_REQUISITE` VARCHAR(30) NOT NULL DEFAULT 'None',
-
`COURSE_ID` INT(11) NOT NULL,
-
`AY` VARCHAR(30) NOT NULL,
-
`SEMESTER` VARCHAR(20) NOT NULL,
-
PRIMARY KEY (`SUBJ_ID`)
-
) ENGINE=InnoDB DEFAULT CHARSET=latin1 AUTO_INCREMENT=500 ;
Then inside you htdocs or document root folder create a new folder and name it as “excel”. Next we need to create a PHP file named “db.php” that will hold our database connection and here’s the following code:
-
<?php
-
$conn=mysql_connect("localhost","root","") or die("Could not connect");
-
mysql_select_db("studentdb",$conn) or die("could not connect database");
-
?>
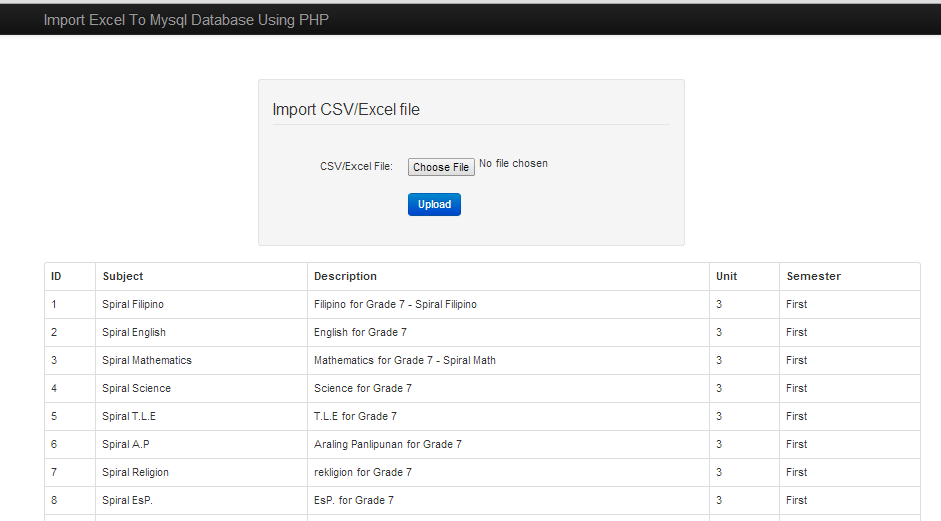
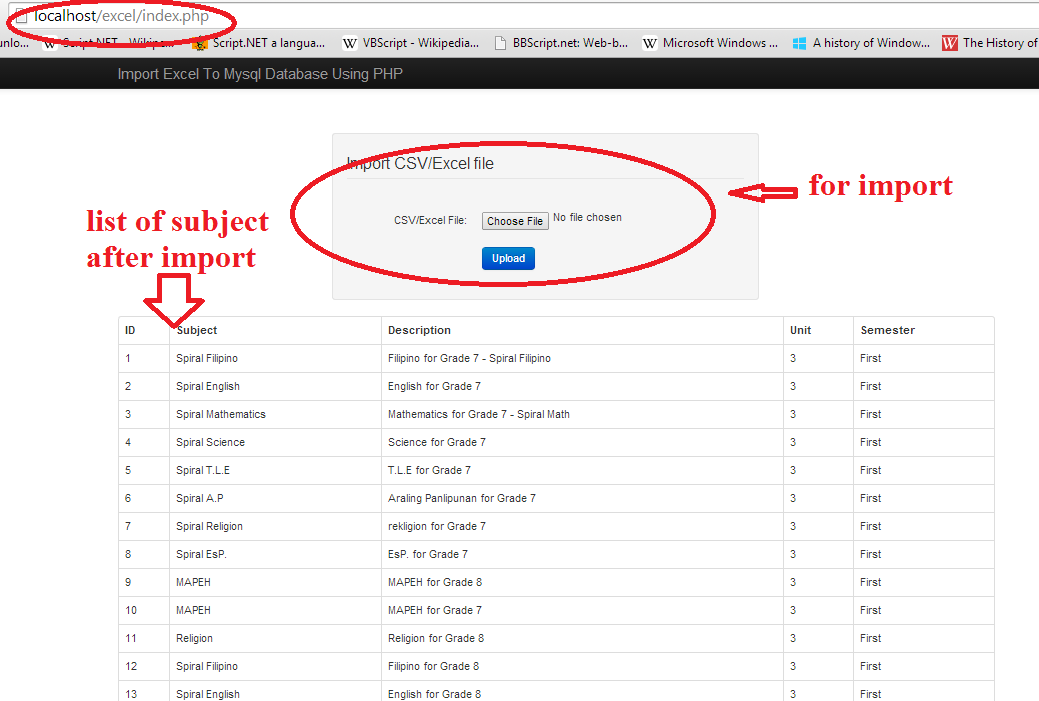
Next create another PHP file named “index.php”,and this php file will be the first page that will load to our browser when we access the “excel” folder from our web directory. And this index.php will load all the list of subject if the subject table is not empty as well as this page will allow the user to import the CSV/Excel file and upload the data to MySQL Database. and it will look like as shown below.
And here’s the code for “index.php” file:
-
<!DOCTYPE html>
-
<?php
-
include 'db.php';
-
-
?>
-
<html lang="en">
-
<head>
-
<meta charset="utf-8">
-
<title>Import Excel To Mysql Database Using PHP </title>
-
<meta name="viewport" content="width=device-width, initial-scale=1.0">
-
<meta name="description" content="Import Excel File To MySql Database Using php">
-
-
<link rel="stylesheet" href="css/bootstrap.min.css">
-
<link rel="stylesheet" href="css/bootstrap-responsive.min.css">
-
<link rel="stylesheet" href="css/bootstrap-custom.css">
-
-
-
</head>
-
<body>
-
-
<!-- Navbar
-
================================================== -->
-
-
<div class="navbar navbar-inverse navbar-fixed-top">
-
<div class="navbar-inner">
-
<div class="container">
-
<a class="btn btn-navbar" data-toggle="collapse" data-target=".nav-collapse">
-
<span class="icon-bar"></span>
-
<span class="icon-bar"></span>
-
<span class="icon-bar"></span>
-
</a>
-
<a class="brand" href="#">Import Excel To Mysql Database Using PHP</a>
-
-
</div>
-
</div>
-
</div>
-
-
<div id="wrap">
-
<div class="container">
-
<div class="row">
-
<div class="span3 hidden-phone"></div>
-
<div class="span6" id="form-login">
-
<form class="form-horizontal well" action="import.php" method="post" name="upload_excel" enctype="multipart/form-data">
-
<fieldset>
-
<legend>Import CSV/Excel file</legend>
-
<div class="control-group">
-
<div class="control-label">
-
<label>CSV/Excel File:</label>
-
</div>
-
<div class="controls">
-
<input type="file" name="file" id="file" class="input-large">
-
</div>
-
</div>
-
-
<div class="control-group">
-
<div class="controls">
-
<button type="submit" id="submit" name="Import" class="btn btn-primary button-loading" data-loading-text="Loading...">Upload</button>
-
</div>
-
</div>
-
</fieldset>
-
</form>
-
</div>
-
<div class="span3 hidden-phone"></div>
-
</div>
-
-
<table class="table table-bordered">
-
<thead>
-
<tr>
-
<th>ID</th>
-
<th>Subject</th>
-
<th>Description</th>
-
<th>Unit</th>
-
<th>Semester</th>
-
-
-
</tr>
-
</thead>
-
<?php
-
$SQLSELECT = "SELECT * FROM subject ";
-
$result_set = mysql_query($SQLSELECT, $conn);
-
while($row = mysql_fetch_array($result_set))
-
{
-
?>
-
-
<tr>
-
<td><?php echo $row['SUBJ_ID']; ?></td>
-
<td><?php echo $row['SUBJ_CODE']; ?></td>
-
<td><?php echo $row['SUBJ_DESCRIPTION']; ?></td>
-
<td><?php echo $row['UNIT']; ?></td>
-
<td><?php echo $row['SEMESTER']; ?></td>
-
-
-
</tr>
-
<?php
-
}
-
?>
-
</table>
-
</div>
-
-
</div>
-
-
</body>
-
</html>
Next, we’re going to create another PHP file named “import.php” that will used to process the data from CSV/Excel to MySQL Database. and here’s the following code:
-
<?php
-
include 'db.php';
-
if(isset($_POST["Import"])){
-
-
-
echo $filename=$_FILES["file"]["tmp_name"];
-
-
-
if($_FILES["file"]["size"] > 0)
-
{
-
-
$file = fopen($filename, "r");
-
while (($emapData = fgetcsv($file, 10000, ",")) !== FALSE)
-
{
-
-
//It wiil insert a row to our subject table from our csv file`
-
$sql = "INSERT into subject (`SUBJ_CODE`, `SUBJ_DESCRIPTION`, `UNIT`, `PRE_REQUISITE`,COURSE_ID, `AY`, `SEMESTER`)
-
values('$emapData[1]','$emapData[2]','$emapData[3]','$emapData[4]','$emapData[5]','$emapData[6]','$emapData[7]')";
-
//we are using mysql_query function. it returns a resource on true else False on error
-
$result = mysql_query( $sql, $conn );
-
if(! $result )
-
{
-
echo "<script type=\"text/javascript\">
-
alert(\"Invalid File:Please Upload CSV File.\");
-
window.location = \"index.php\"
-
</script>";
-
-
}
-
-
}
-
fclose($file);
-
//throws a message if data successfully imported to mysql database from excel file
-
echo "<script type=\"text/javascript\">
-
alert(\"CSV File has been successfully Imported.\");
-
window.location = \"index.php\"
-
</script>";
-
-
-
-
//close of connection
-
mysql_close($conn);
-
-
-
-
}
-
}
-
?>
After this, you can try it with your own, and I have attached with this sourcecode the example csv/excel file used for this tutorial. By the way in this application I am using the twitter bootstrap framework, you can download and use it like in this application.
If you want to see some new Source Code or Application and Tutorials Just click here.


![PHP Redirect [ Javascript Redirect ]](https://www.f5craft.in/uploads/images/image_140x98_5e80487d7d20c.jpg)


